Documentation
A setup guide and general information to help you get the most out of your new marketplace.
- Help Center
- Documentation
Getting Started
Thank you for purchasing DnDork marketplace! We hope you will find answers to all your questions regarding DnDork marketplace answered in this Documentation as much in details as possible. However, if you still need support, do not hesitate to send an email at support@dndork.com.
Technical Requirements
DnDork marketplace has been developed in CakePHP 3.4 (a PHP framework) and MySQL. It should work perfectly on any shared hosting that supports PHP 5.6 or greater.
At minimum, you need the following to install and run DnDork marketplace:
- HTTP server like Apache or nginx having
mode_rewriteenabled - PHP 5.6.0 or higher (including PHP 7.1)
mbstringPHP extensionintlPHP extension- MySQL 5.1.10 or greater
- A modern Browser which supports HTML5/CSS3 (IE9+, Firefox, Safari, Chrome, Opera)
Please read CakePHP installation instructions for complete requirements.
Troubleshooting: If you do not know how to enable PHP extensions (intl
& mbstring), please check out Troubleshooting section.
Installation
Installing DnDork marketplace is a pretty simple process. Upload the files, create a database, set a few settings and your marketplace is ready to launched. The instructions are described in the following easy to follow steps.
Important: If you require installation service, we do provide it for only $30 additional. Please order setup package to avail our installation service.
Note: The following instructions are intended for fresh installation of DnDork marketplace only. If you want to upgrade your existing installation, please refer to Upgrade section.
Step 1: Configure database
Go to your hosting admin panel and create an empty MySQL database and a user. If you've never created a MySQL database & user before, follow this easy to follow video tutorial or this step by step guide on doing so in cPanel. If your host does not use cPanel, refer to your host's documentation on creating a MySQL database & user.
Unzip the downloaded file to your hard disk and locate a file called dndorkdb.sql. Open phpMyAdmin from cPanel
provided by your hosting company to import the dndorkdb.sql file in the database you created above. If you've never
imported MySQL database before, follow
this step by step guide.
Once you are done with database creation and import, open the file config/app.php in any text or code editor.
In the file you've just opened, set the MySQL credentials as shown below:

Warning: Do not change anything else in config/app.php if you're
not sure what it is. It is the core file of DnDork marketplace software.
Step 2: Upload DnDork Marketplace Files
The next step is to upload DnDork marketplace files at your server. You can use an FTP client like Cyberduck, FileZilla or the 'File manager' in your hosting control panel to upload DnDork marketplace files.
Following are the steps you need to take while uploading files via FTP:
- Using FTP client, login to the server where your website is hosted
- Using FTP client, navigate to the
/yourdomain.com/directory - Using FTP client, upload all DnDork marketpalce files on remote server directory
Step 3: Add Your Marketplace Details
After uploading the files, open your browser and go to http://yourdomain.com. If database
is configured properly and all the files are uploaded, it will show you home page of your marketplace.
At this point, you are done with installation. You are ready to add your marketplace
details (name, URL, contact email, phone number & logo).
Click on top right icon  to login into your
marketplace. Please use the following default credentials to log in:
Username: user@dndork.com
Password: 123456
After logging in, navigate to Settings page to update your marketplace
name, URL, contact details and logo. For more information about marketplace settings,
please read Customization section of
documentation.
Features
The DnDork marketplace comes packed with features that help you organize and manage your domain portfolio. This section documents those features and how to use them successfully.
Categories Management
You can add unlimited domain categories to organize your domains in better way. You can manage all categories under
Marketplace -> Categories.

You can add, edit and delete categories as following:
1. Add Category
To start creating your first category, click on Add Category button as shown in the picture above.
The following form will appear:

Enter category name, slug and short description in form above and then click on Save button to
add the category. The slug is the user friendly and URL valid name of a category. It is used to create a permalink for each category.
Pro Tip: It is a good practice to use small letters and numbers only in
slug. Use dash (-) instead of empty space. A good example of slug for category named Computer & Technology
would be computer-technology.
2. Search Category
You can search category by entering name, slug or created date.
3. Edit, Suspend & Delete Category
Click on edit to update the category information. You can also suspend the category. A suspended category will not be visible publicly. You can also restore suspended category anytime.
Warning: Be careful while deleting a category, it will delete all the domains and inquiries associated with it.
Domains Management
DnDork marketplace supports unlimited domain listings for selling and renting. To view all domains, go to
Maketplace -> Domains.

1. Add Domain
To start creating your first domain, click on Add Domain button as shown in the picture above.
The following form will appear:
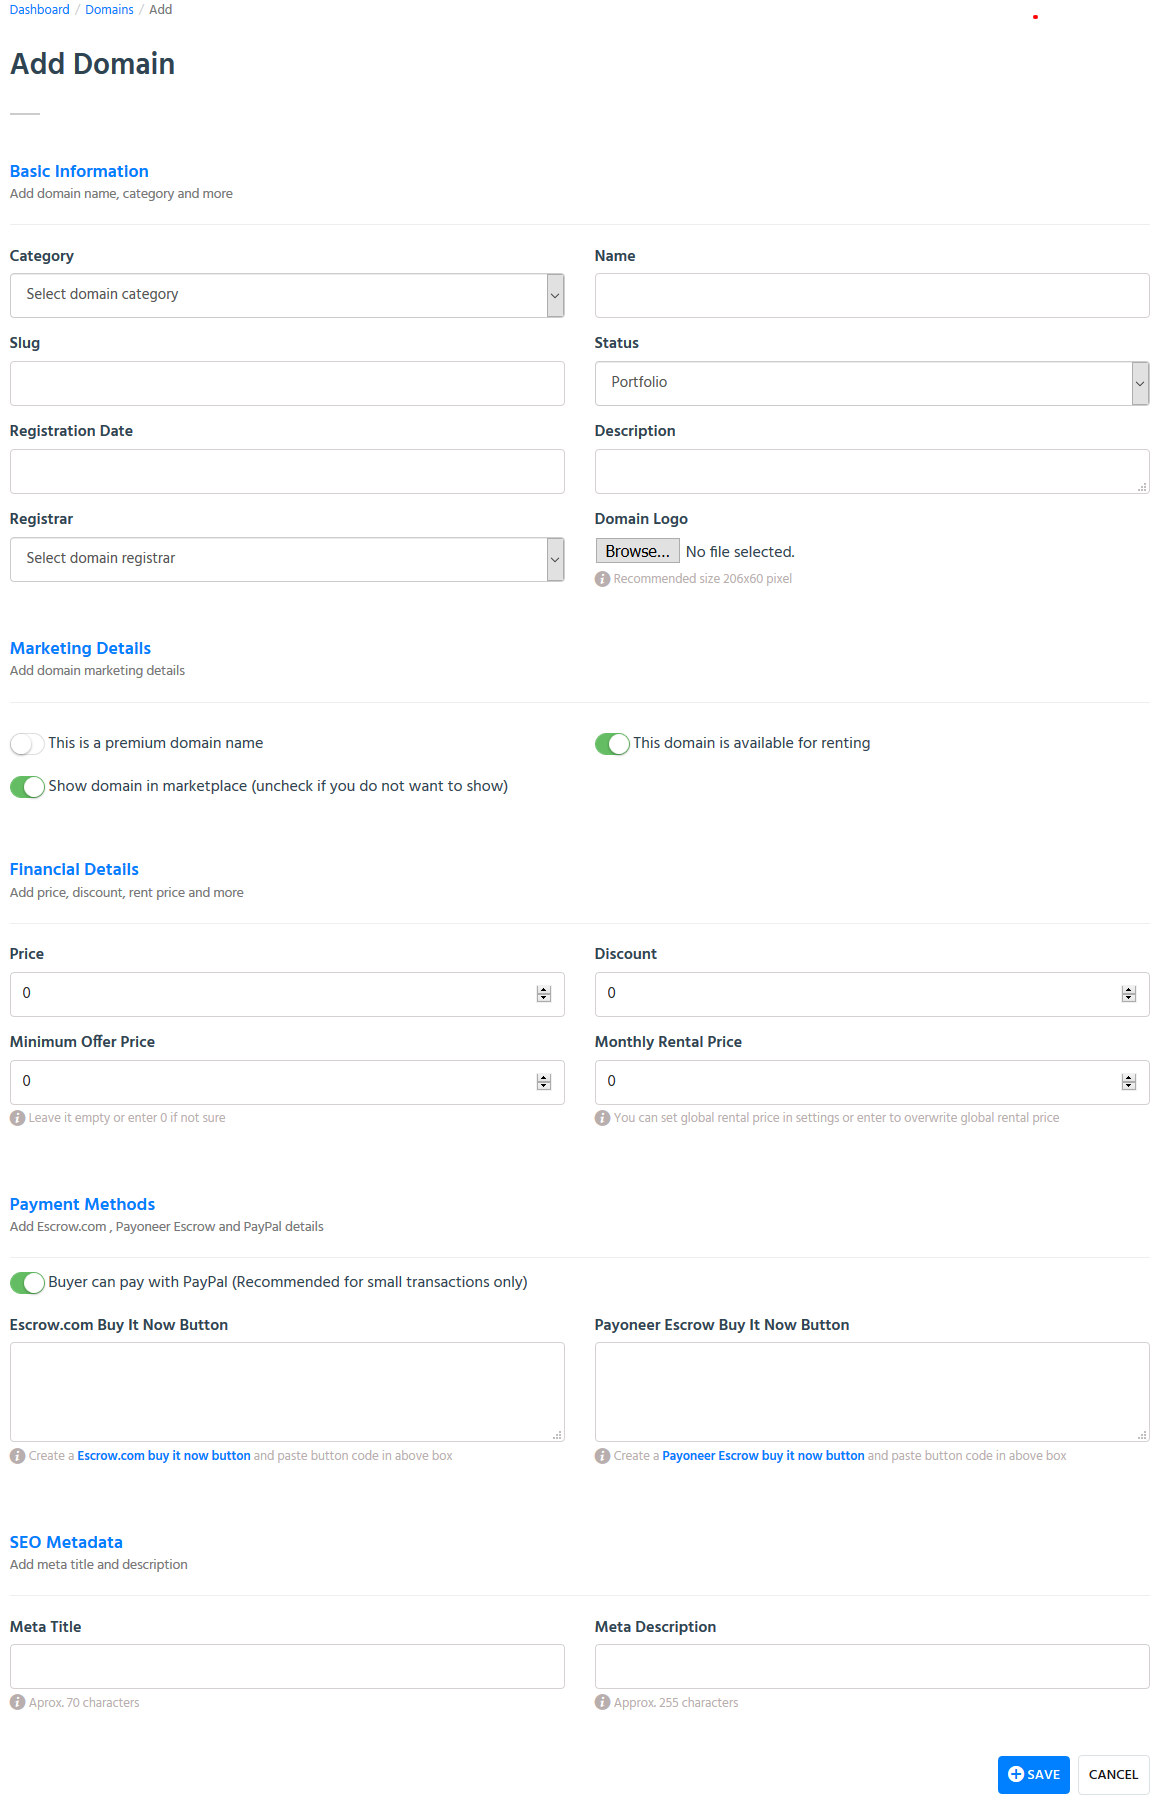
1. In Basic Information section, select domain category & registrar, enter domain name, slug,
status ─ only Portfolio domains are publicly visible ─ logo and other details.
2. Under Marketing Details section, check This is a premium domain name checkbox
if you want to list the domain name under premium listings. Premium domains are shown at homepage. Moreover, you can
also list domain for renting as well as control the public visibility of domain in marketplace.
3. In Financial Details section, add domain price if you want to list it under Buy Now option,
discount amount(if any), minimum offer price (it will force the buyer to enter great than minimum price while making an offer)
and monthly rental price (leave it empty if you want to use default rental price you added under Settings).
4. In Payment Methods section, you can select whether to show PayPal button (coming soon) to buyer or not.
You can also add Escrow.com and
Payoneer Escrow buy it now buttons code snippet which buyer can use to pay for the domain.
5. SEO Metadata is helpful to rank higher in Google Search. It is recommended to add
meta title and description.
2. Bulk Import Domains
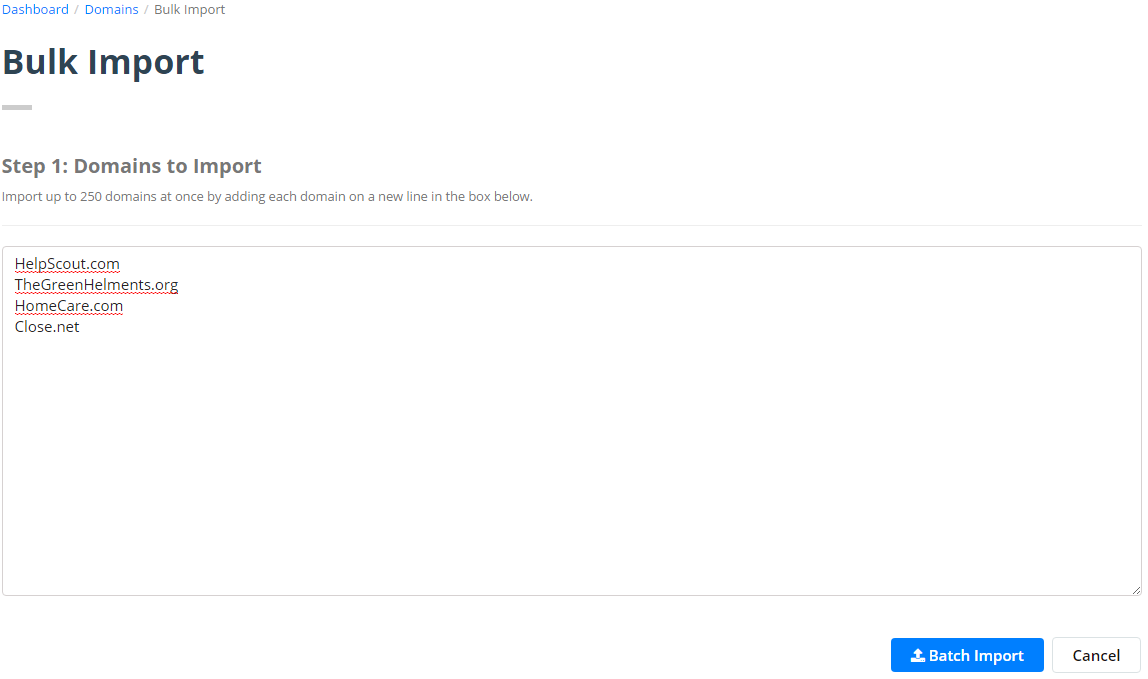
Bulk import tool is helpful to list multiple domains at once. To use this tool, click on Bulk Import button as
shown in the picture above. The following form will appear. Add all the domains (one domain name per line) in the box. You
can add as much domains as you want but it is recommended to add at most 250 domains at once. Then click on
Batch Import button to proceed to next step.
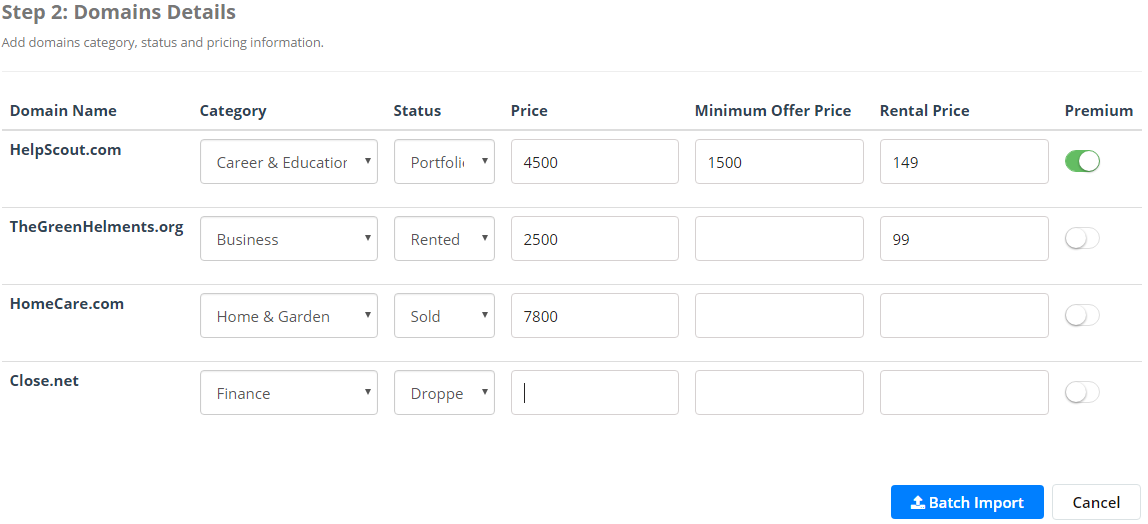
In next step, select domain category, status and add pricing details before clicking on Batch Import button again
to go to last step.
The software will process all the domain names and will show you status of each domain in last and final step.

3. Export Domains as CSV File
You can also export all domains as CSV. Click on Export as CSV link found on manage
domains page.

4. Search Domain
You can search domain name by entering name, slug or status in search box visible at top right of all domains.
5. Filter Domains
You can also filter domain names based on extension or status by using dropdowns visible at top left of all domains.
6. Edit, View Offers and More Operations
There are few more helpful operations listed under this dropdown. You can edit domain name details, mark it premium, view all offers as well as suspend or delete it.
Warning: Be careful while deleting a domain name, it will delete all the offers associated with it.
Inquiries Management
Under Marketplace -> Inquiries section, you can view and manage all the offers received.
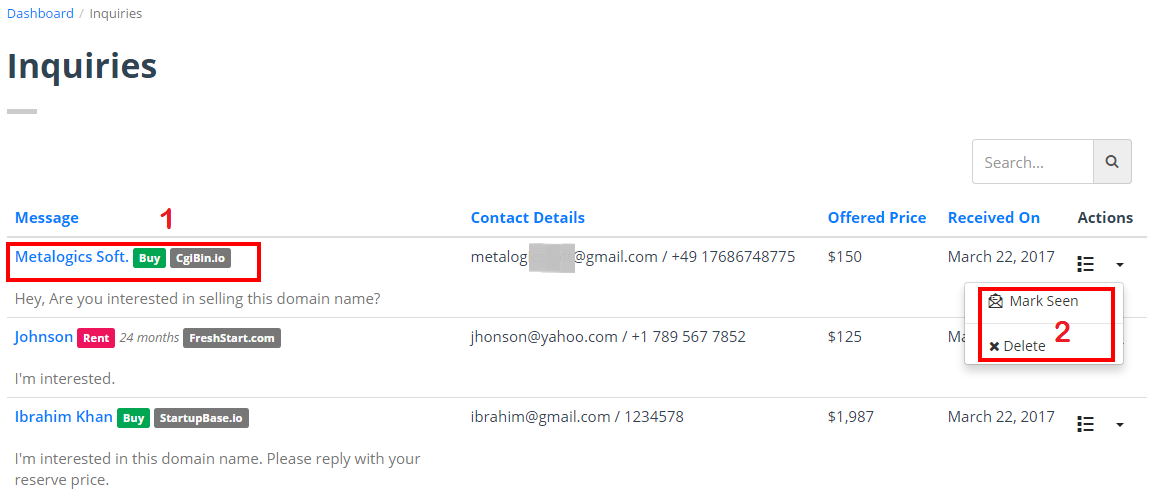
1. View Inquiry
Click on the buyer name to view the complete offer details as well as to reply back. The view domain page
will look like following:
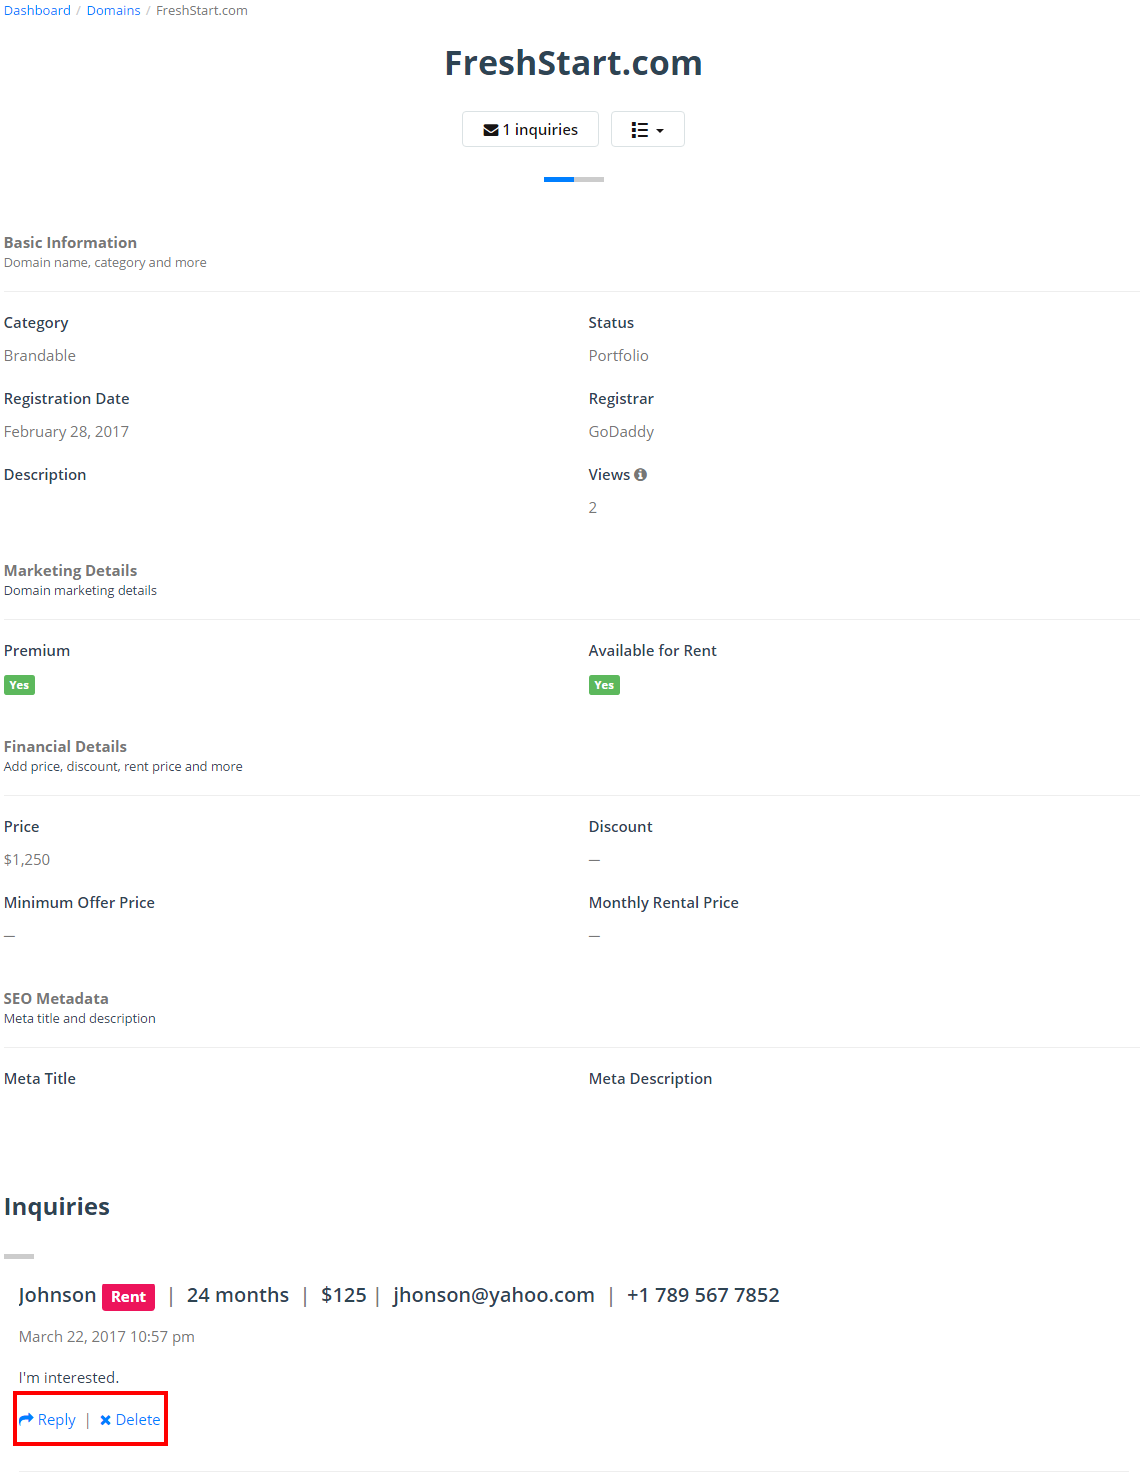
You can reply to offer by clicking on Reply link. You can also remove the offer by clicking on
Delete link.
2. Seen/Unseen & Delete Inquiry
Use this menu to mark the inquiry seen or unseen. Unseen offers are shown at top of all inquiries. Use
Delete link to delete the offer permanently.
Notifications Management
Notifications are a great way to showcase latest marketpalce news, your live auctions as well as discount offers.
Navigate to Notifications section to manage all the notifications.

1. Add Notification
To add your first notification, click on Add Notification button as shown in the picture above.
The following form will appear:
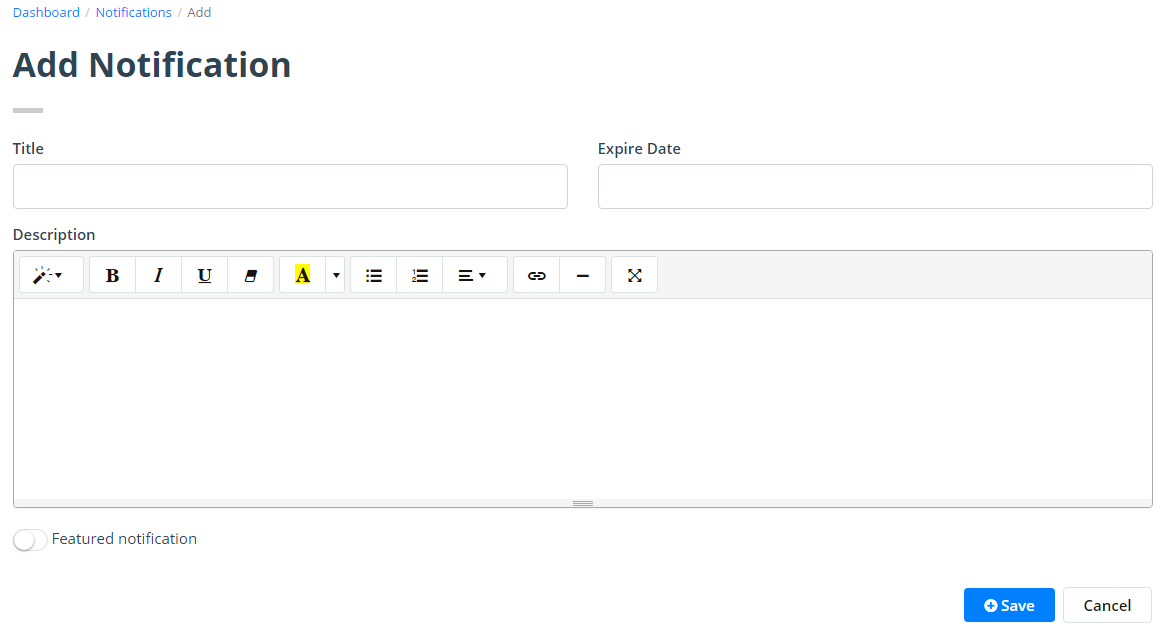
Add notification title, expire date and details in above form. You can use expire date to stop showing it after a specific date. If you want to show it for indefinite period, leave the expire date field empty. Featured notification checkbox is used to mark the notification as featured. All the featured notifications are shown first in top bar.
2. Search Notification
Use this box to search the notification by title, expire date and details.
3. Edit, Suspend & Delete Notification
Use this menu to edit, delete or suspend any notification.
User Management
You can create unlimited accounts for your fellow domainers and staff members at DnDork marketplace.
Navigate to Users section to manage all the users.

1. Add User
To add your new user, click on Add User button as shown in the picture above.
The following form will appear:

2. Search User
Use this box to search the user by first name, last name and email address.
3. Edit, Suspend & Delete User
Use this menu to edit, delete or suspend any user.
Sitemap
You can access your marketplace sitemap at http://yourdomain.com/sitemap.xml. It is
useful for Google SERPS inclusion. You may need to edit this if you add/delete pages to your system.
You can look at demo sitemap to get an idea about it.
Customization
DnDork marketplace comes with a powerful admin panel that let you customize anything you want ─
whether it is marketplace color scheme, name, contact information, SMTP details or social media accounts.
Navigate to Settings to customize the marketplace details. The following form will appear:

1. Website Title
This is the name of your marketplace. It will be used everything wherever marketplace name is visible. It is highly recommended to keep it precise and meaningful for example DnDork, Filry etc.
2. Website URL
This is the public URL of your marketplace landing page. Do not use any relative URL (e.g. http://yourdomain.com/domains) or trailing slashes at the end. It is used to load resources and to generate password reset URL. Your website URL must be http://yourdomain.com (for HTTP) or https://yourdomain.com (for HTTPS).
3. Email Address
Email address is used for all sort of communications with buyers, leads and more. This is your email address for offer reply form, general contact or domain offer forms.
Important: Make sure that the email address you entered is valid and is able to receive emails. Otherwise, you won't be able to receive inquiry notifications as well as general contact emails.
4. Phone
You can add your phone number to let the interested buyers contact your directly. If added, it will be visible at website top right corner.
5. Skype
Right now, it is optional and is not used anywhere. In future, it will be used at offer submission form.
6. Main Headline
This is the main headline that is shown at landing page. For example, in our demo, it is DnDork Marketplace. You can choose your own that best describes your marketplace.
7. Short Bio
Short bio is visible under main headline. It should be precise and descriptive.
8. Website Logo
Upload your website logo here. The recommended size is 206 pixels width and 65 pixels height (206x65 pixels).
9. Show Notification Top Bar
You can control the visibility of top bar notifications with it. If unchecked, topbar won't be visible at home page as well as any other front end page.
10. DnDork Marketplace Credit
By default, a link is added at the bottom of the website called Proudly Powered by DnDork Marketplace as a good will gesture. If you do not want to show, please uncheck this checkbox. But we encourage to keep the link.
11. Marketplace Color Scheme
DnDork marketplace comes with 12+ pre-built themes that offer you an opportunity to brand your marketplace as per your own color scheme. You can change the marketplace color scheme anytime by select a new color from dropdown list.
12. Notification Bar Color
You can change the background color of top bar notification by selecting a new color from this dropdown list. There are 30+ colors available to choose from.
13. Default Currency
Select your marketplace default currency. It is used for domain pricing as well as escrow transaction creation (coming soon).
14. Default Monthly Rental Price
You can set a default monthly rental price here. It is possible to overwrite this price while creating a domain listing.
15. Show/Hide Our Process
You can show or hide our process section visible at home page as well as at domain landing page.
16. Show/Hide Related Domains
Show or hide related domains section visible at domain landing page. This section features premium domain names.
17. Offer Receive Email
It controls whether you want to receive an email or not when a buyer sends you an offer.
18. Phone Number Required
Check this checkbox if you want to force the buyer to enter phone number while sending an offer.
19. GA Tracking Code
Enter your Google Analytics (GA) tracking code to track the visitors and sales. Learn more about Google Analytics and how to generate GA for your marketplace.
20. Google Site Verification Code
Enter your Google Search Console verification code here to verify your website. Google Search Console is useful monitor the Google SERPS traffic. Learn more about Google Search Console account setup.
Pro Tip: It is recommend to setup Search Console account to monitor Google SERPS traffic. You should add your sitemap in Search Console to let the Google knows about your website all URLs. Learn more about your marketplace sitemap.
21. Meta Title
Add default meta title value to boost your website SEO. It should be less than 60 characters.
22. Meta Description
Add default meta description of up to 160 characters.
23. Social Links
Add your social media accounts links here. These links are shown at right bottom of the website in footer section.
24. SMTP Details
Add external SMTP information for sending an email. It is not required if you hosting provider supports email services. Learn more about SendGrid recommended SMTP information (SendGrid is just an example, you can use any other SMTP provider).
25. About Us
Add details about you and your company in this box. It will appear under About Us page.
26. Privacy Policy
Add your company privacy policy here. It will appear under Privacy Policy page. You can edit the default privacy policy as well.
27. Terms of Services
Add your company terms of services here. It will appear under Terms of Services page. Use default terms of services if you want.
28. Frequently Asked Questions
Add all frequently asked questions here. It will appear under FAQ page. We've added default FAQ to give you an idea about the possible questions.
Upgrade
Note: The following instructions are only valid if you didn't modify the previous version - add or update any file(s). If you've modified the previous version, please keep track of the changes you made and update the new version accordingly.
We regularly release new features, fix bugs and update 3rd-party plugins to keep the DnDork marketplace secure and fast. In order to apply these changes, download the latest version of DnDork marketplace software and then do the following:
1. Unzip the downloaded zip.
2. Transfer app.php from the /config/
folder in your current DnDork marketplace installation to the /config/
folder in the new build you've just unzipped.
3. Delete the /webroot/uploads/ folder from the new build in order to
keep your current /webroot/uploads/ folder contents intact on your server.
4. Delete the .htaccess file from the new build if you've previously
made any modifications to it on the server.
5. Upload all files from the new build into your DnDork marketplace installation directory replacing all files.
6. Locate dndorkdb-changelog.sql in unzipped root folder and open the file in
your favorite editor (e.g. Notepad++). This file includes all the database changes we made since version 1.0.0.
You need to apply these database changes to your current database in order to use the latest features. If you are not sure
how to run SQL query on database with phpMyAdmin (or any similar software), please follow this
step-by-step tutorial.
Warning: It is strongly recommended that you backup your existing installation including database before upgrading to new version. This will ensure that you don't lose the previous installation files in case if upgrade process failed to complete. DO NOT DELETE THE DATABASE WHEN UPGRADING.
Support
We are committed to helping you solve any problems you encounter along the way. Before contacting us, please make sure that you:
- read this documentation carefully
- browse the Frequently Asked Questions on our website
If you didn't find answer to your problem or want to report a bug, please send us an email at support@dndork.com. Please take some time until we respond usually within 12-36 hours.
Important: For the fast troubleshooting, please send us detailed informations about the issue and make sure to send us your site URL where you are using (or want to use) DnDork marketplace. Unfortunately, we cannot troubleshoot from screencast videos or screenshots.
Licenses
Use of an item is bound by the license you purchase. A license grants you a non-exclusive and non-transferable right to use and incorporate the item in your personal or commercial projects. There are several licenses available:
Single Application License
- Your use of the item is restricted to a single installation.
- You may use the item in work which you are creating for your own purposes or for your client.
- You must not incorporate the item in a work which is created for redistribution or resale by you or your client.
- The item may not be redistributed or resold.
- If the item contains licensed components, those components must only be used within the item and you must not extract and use them on a stand-alone basis.
- If the item was created using materials which are the subject of a GNU General Public License (GPL), your use of the item is subject to the terms of the GPL in place of the foregoing conditions (to the extent the GPL applies).
Multiple Applications License
- Your use of the item may extend to multiple installations.
- You may use the item in work which you are creating for your own purposes or for your clients.
- You must not incorporate the item in a work which is created for redistribution or resale by you or your clients.
- The item may not be redistributed or resold.
- If the item contains licensed components, those components must only be used within the item and you must not extract and use them on a stand-alone basis.
- If the item was created using materials which are the subject of a GNU General Public License (GPL), your use of the item is subject to the terms of the GPL in place of the foregoing conditions (to the extent the GPL applies).
Extended License
This license must be purchased if you intend to license, sublicense, redistribute, or resell the final product.
- Your use of the item may extend to multiple installations.
- You may use the item in work which you are creating for your own purposes or for your clients.
- You may license, sublicense, redistribute, or resell the item in the following circumstances:
- the item is incorporated into a larger work you have created; or
- if you modify the item and resell the end product.
- If the item contains licensed components, those components must only be used within the item and you must not extract and use them on a stand-alone basis.
- If the item was created using materials which are the subject of a GNU General Public License (GPL), your use of the item is subject to the terms of the GPL in place of the foregoing conditions (to the extent the GPL applies).
Nameservers Setup
Since DnDork version 1.0.2, it is possible to use nameservers for for-sale landing pages. There are multiple methods to point the domain to its for-sale landing page. Please not that the domain for-sale landing page will only appear if the domain exists in your marketplace domains list. Some of the methods are following:
1. CNAME Method. If you are using cloud hosting with static IP (like Amazon AWS or Google Cloud) to host
your marketplace software, you can add CNAME to point your domain to marketplace for-sale landing page.
2. Domain Alias. It is only applicable if you are using shared hosting to host your marketplace script. Your primary hosting domain must be the marketplace domain. Otherwise, it won't work. Learn how you can add Domain Aliases in cPanel.
3. Addon Domain. You can also add your domain as addon in your shared hosting cPanel and select document root folder the one where your marketplace softare is hosted. Learn how you can add Addon Domains in cPanel.
Troubleshooting
How can I activate intl & mbstring PHP extensions?
if you are getting following error:
Fatal error: You must enable the intl extension to use CakePHP. in
/home/<...>/public_html/config/bootstrap.php on line 27
It means you intl PHP extension is not active which is one of the core requirement
to use DnDork marketplace.
Please follow the following step-by-step guide to enable required PHP extensions.
cPanel Hosting:
Follow this guide
Dedicated Server (via SSH):
Follow this guide